
In the previous post, we had a look into some general aspects of IaC and how to set up your bicep environment. With this blog, we will clarify the general structure and parts of the bicep templates and do a first deployment with these.
Bicep structure
Basic structure of the templates
- Deployment level (target scope)
- Custom Functions and Types
- Parameters and variables
- Resource Definitions
- Module calls
- Output Values
Details on file division will follow in the further course of the series in the area of modularization.
Variables and Parameters
Variables and parameters can also be used in Bicep for basic dynamization. The logic follows the same familiar from ARM templates or Terraform: Parameters or their values are usually defined outside the template and entered into it, variables are used for internal reuse. For parameters, the type must be defined directly and any value assigned in the Bicep file serves as default or fallback for a value that has not been passed. The type of variables is determined at runtime, and they must always have a value. Both have in common that they cannot be overwritten. Numbers, strings, booleans, arrays, objects and self-defined types are supported[1]. To use it, it only needs to call the name at the desired code location. Variables can also be dynamically generated using a loop construct.
var storageAccountName = ‘mystorageaccount’
param storageAccountName string = ‘mystorageaccount’
Decorators
A common application in Bicep files are decorators. These are preceded by an @ and are used to describe (@description) or validate parameters. This can be used to restrict a range of values, for example, by passing a list of possible values or by passing a certain length of a string. Furthermore, modules and resources can also be described and @batchSize enables control over parallel deployments of several services.
@minLength(3)
@maxLength(11)
param storagePrefix string = ‘stg007’
@allowed([
‘Standard_LRS’
‘Standard_GRS’
‘Standard_RAGRS’
‘Standard_ZRS’
‘Premium_LRS’
‘Premium_ZRS’
‘Standard_GZRS’
‘Standard_RAGZRS’
])
In keeping with the area of descriptions, the comment options should be briefly mentioned at this point. These follow the C# scheme and can be stored in a single line with // or for multi-line with /*<text>*/. For working with VS Code, the commands ctrl+k+c and ctrl+k+u are helpful by default.
Outputs
Outputs are a handy tool for outputting certain properties of resources after deployment, such as created endpoints, IDs, or IP addresses. The syntax for the definition also follows familiar patterns here.
output storageAccountId string = storageAccount.id
Access can be done across file and module boundaries and thus be transferred from a daughter module to the orchestration template, for example. At this point, it is also practical to view the output values in the Azure Portal after the template has been processed, if the appropriate deployment is selected:
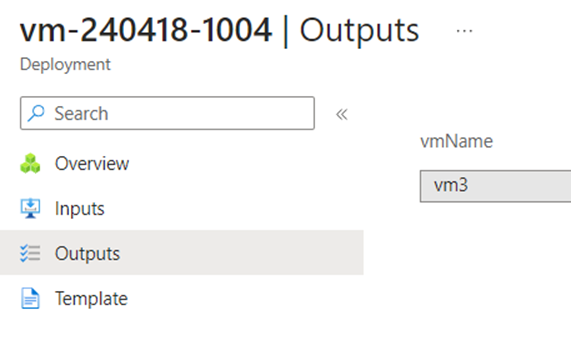
Output values of the deployment in the Azure portal
Parameter transfer
Once the parameters for a template have been defined, they must be passed at the time of deployment, unless standard values have been stored in the code. There are several ways to do this, directly as attributes in the deployment command or within a separate file.
.bicepparams file or ARM file
With Bicep, parameter files can be created in two different formats. On the one hand, JSON files can be used with the classic ARM scheme, and on the other hand, there is also a .bicepparam file as a new feature in Bicep. File names can be chosen freely. The creation is done either manually or conveniently via the “Generate Parameters File” context menu within the resource template, in which case the existing parameters are already adopted. Conversion to the other type is also possible without any problems. The .bicepparam file requires a using reference to the template to link and older versions of Bicep and Powershell/CLI are not supported.
using './storage.bicep'
param storagePrefix = 'stg456'
param storageSKU = 'Standard_LRS'
The advantage of the bicep file is also a significant saving of lines of code. In addition, more complex or intelligent objects can be used, as expressions are also supported. A disadvantage would be that it must be available locally and cannot be referenced by URL like its JSON counterpart.[2] However, both variants do not replace the definition of the parameters in the resource template, they must also be known there.
Direct transfer in command or as an object
For the Powershell or CLI commands, the parameters can simply be appended with -parametername “123” or double — for the CLI. However, since there are often several parameters to pass, it is a good idea to create an array or a hashtable in advance, which is then passed as the only parameter.
Example of a hashtable for the Input parameter in PowerShell:
$parameterObject = @{
templatefile = “storage.bicep”
storagePrefix = “sto007”
ResourceGroupName = “my-rg”
}
The order or priority of the evaluation of parameter values is as follows: A standard value is overwritten by the file definition, which in turn is overwritten by information via the command line.
Deployment Scopes
Bicep speaks of different deployment scopes – the target level to which provision is made. In most cases, this is the resource group in which services are created. This is the standard and does not need to be mentioned separately in the template. Furthermore, there are the areas:
- Azure Tenant
- Management Groups
- Subscriptions
- A resource itself (Extensions),
for which the targetScope keywordthen becomes important.
At the tenant level, management groups or subscriptions would be deployed. A classic example of the level of management groups would be policy assignments and at the level of a subscription, for example, budgets, advisor or service alerts and resource groups are created themselves. Finally, the scope of a single resource follows, which we would need in the area of an extension deployment. We will discuss this in the further course of the series – as well as the option to overwrite the scope within a template, which is particularly practical in modularization.
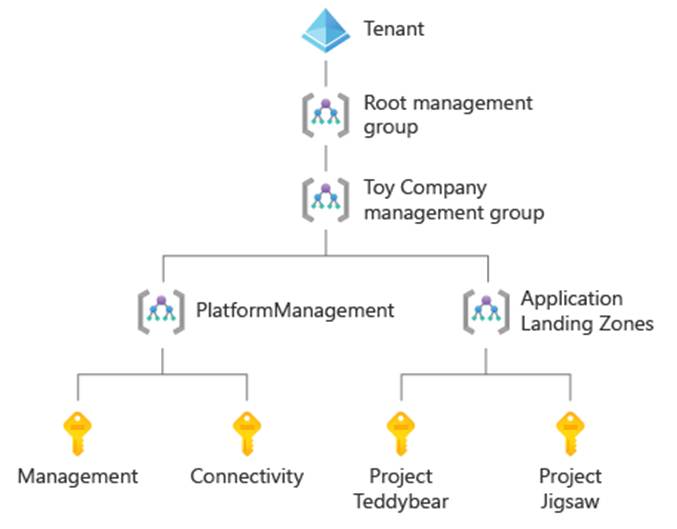
Azure Tenant Structure Overview ©Microsoft [3]
A first deployment
Once a first version of our code is ready, we can start the deployment and create the resources in Azure. At this point, we are still staying on our own development machine locally. Again, we look at the variants directly within VS Code and via the command line.
As an example, a virtual machine and its required “additional resources” are provisioned – a VNet with a subnet, a disk, a network card, a network security group and a public IP address. The Bicep template can be accessed at[4]. We’ll look at the options directly in Visual Studio Code and script commands. The Bicep template is 120 lines long, the corresponding variant as an ARM template requires 180 lines for the same resources. Figure 4 shows the components in the overview, generated by the Bicep Visualizer in VS Code.
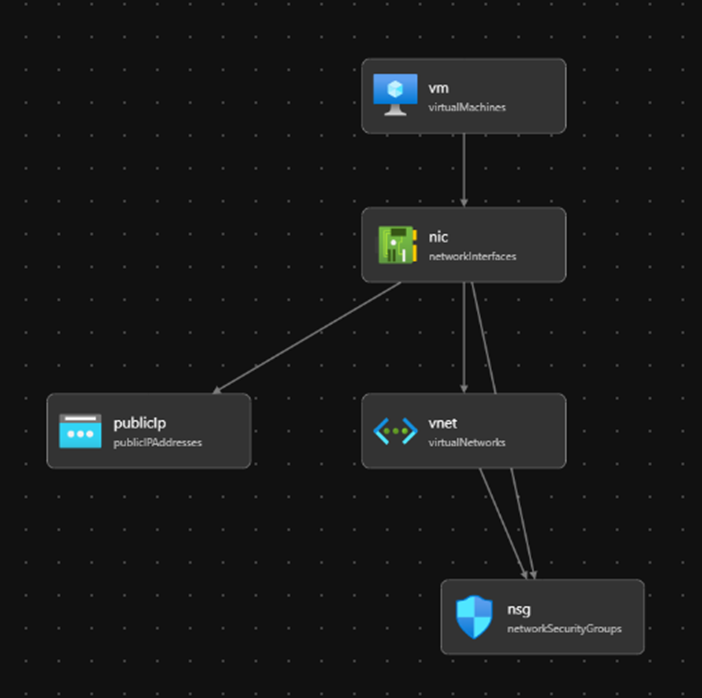
Component diagram of the Bicep Visualizer
Directly via VS Code
If a Bicep template is in focus in VS Code, the process can simply be started via the “Deploy Bicep File” context menu. Provided that you log in to the Azure Account Extension, you can then conveniently select the subscription, the resource group and a parameter file via the editor. At the next deployment, these values are already preselected. Especially in the first stages of developing the template, this procedure can be very practical. However, the information in the terminal about the deployment carried out is quite limited.
Also available via the menu is the experimental [5] “Bicep Deployment Pane”, which can still show the steps mentioned in a good overview. It also enables a one-click deployment if the appropriate information is configured in the GUI. In addition, output values are directly visible.
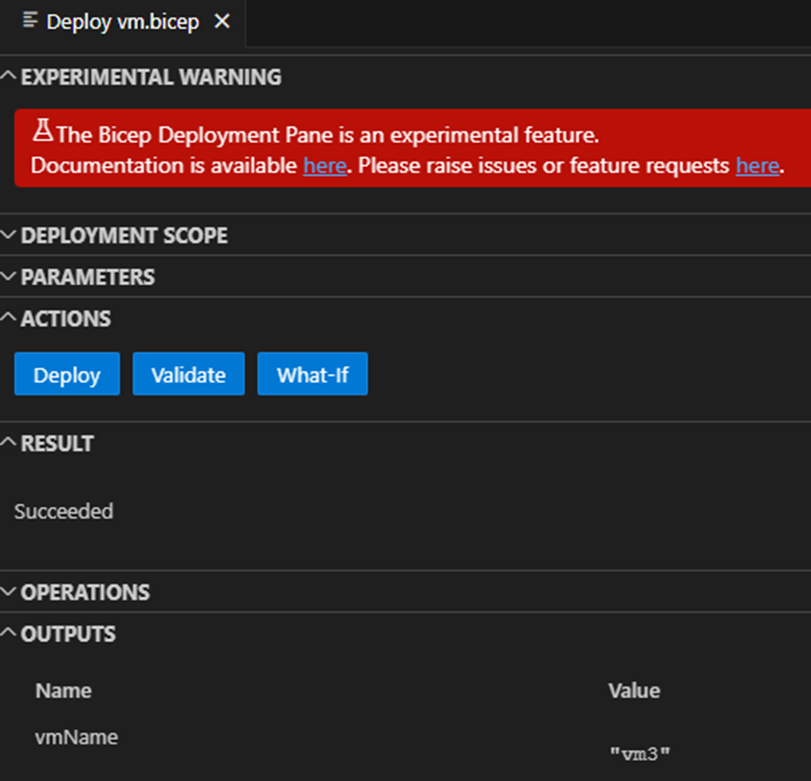
Experimental Bicep Deployment Pane
Azure CLI or PowerShell commands
If you prefer to work with familiar script commands or if the way via VS Code does not make sense in any other way, alternative tools for creating the resources are available via the Azure CLI or Azure PowerShell. These are each specifically geared to the scope of the deployment and work in the same way as for ARM templates. With this approach, significantly more details of this can be seen in the terminal directly after successful provisioning, so this can be an argument for this variant depending on your needs.
For a common deployment on the scope of the resource group, this would be, for example:
Azure CLI:
az deployment group create --template-file vm.bicep --resource-group 'rg-test'
or Azure Powershell:
New-AzResourceGroupDeployment -ResourceGroupName rg-test -TemplateFile vm.bicep
The commands can be executed in the VS Code terminal or another shell. Logically, these variants are often found in automation setups in pipeline deployments. For the other scopes, other commands are needed, see[6] for CLI and[7] for PowerShell.
Summary
In this blog, we went through the different parts of a bicep template and did a first deployment. Bicep is also not without challenges, but especially when focusing on the Azure Cloud, it is a very good tool for automating the infrastructure. Following up in this series, in the next posts we will look at how the code can be made more dynamic and leaner with expressions, functions and conditions. There are also charming options for converting between ARM and Bicep, as well as options for importing or referencing other resources.
[1] https://learn.microsoft.com/en-us/azure/azure-resource-manager/bicep/user-defined-data-types
[2] https://learn.microsoft.com/en-us/azure/azure-resource-manager/bicep/parameter-files?tabs=Bicep
[3] https://learn.microsoft.com/en-us/training/modules/deploy-resources-scopes-bicep/2-understand-deployment-scopes
[4] https://github.com/thomash0815/bicepseries
[5] https://github.com/Azure/bicep/blob/main/docs/experimental/deploy-ui.md
[6] https://learn.microsoft.com/en-us/azure/azure-resource-manager/bicep/deploy-cli
[7] https://learn.microsoft.com/en-us/azure/azure-resource-manager/bicep/deploy-powershell